Home - Sea Glass Crafts - Sea Glass Mirror
Sea Glass Mirror Crafts Project
Make a Sea Glass Mirror or Photo Frame
Ways to use your collection of sea glass! Easy to do, yet unique and attractive. Photos and steps to create a beach glass frame.
A sea glass picture frame or mirror is a nice and fairly simple way to use your sea glass collection.
Although I will be talking about creating a sea glass frame for a mirror, the same steps apply to a photo frame.
Also, this is a project that doesn't require the special equipment necessary to know how to drill sea glass.
Summary of this page:
Find a mosaic-ready mirror (or flat wood picture frame) you like and glue or grout your pieces of sea glass onto it around the edge of the mirror to give it a border.
Depending on your preference, you could also glue on shells, sand (craft sand will do if you don't have access to a beach), pebbles, driftwood, or other attractive things you've found at the beach.
Steps to making a Sea Glass Mirror:
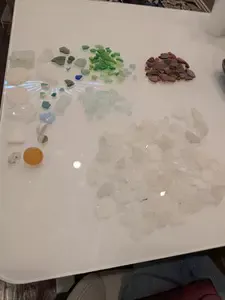
1. First, lay your mirror out on a table.

Before gluing or grouting, decide how you want to arrange the sea glass and shells and whatever else you're using.
Move things around until you find a sea glass mirror layout that you are happy with.
2. Next, take your super glue, epoxy glue, or silicone adhesive and glue each piece onto the mirror.

After you have glued everything onto the mirror, you can then go back and fill in the empty spaces with small shells, beach pebbles, or sand, depending on the effect you want.
Let it dry completely.
At this point, you could add your picture-hanging hardware and be finished.
Or you could go on to the next step.
3. Wire-wrapping Your Mirror
 Wire cutters and a knitting needle as well as #18 gauge copper wire are pictured.
Take wire (copper wire is nice and not expensive) and wire wrap the mirror, being sure to not cross the center of the mirror.
Tools and materials you will need to do this are:
- wire cutters and
- a knitting needle as well as
- #18 or #16 gauge copper wire

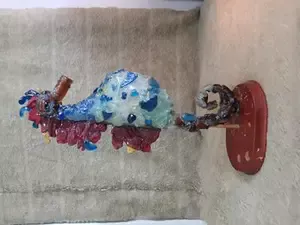
You can do a simple wrap as shown in the photo of the back of the sea glass mirror here, or use your creativity to make the wrap more artistic.

Finish off the wrap with a loop made as shown in this closeup.

When you are done, the mirror should look similar to this.
Follow steps 1 and 2 for creating sea glass photo frames.
Related Ideas

An additional idea would be to use smaller mirrors and instead of creating it as a mirror to be hung on the wall, place a candle on top of it and use as a centerpiece or gift.
Have you tried one of these projects or another project with sea glass? Share your work with us!
Have you made one of these Sea Glass Crafts projects or one like it? We'd love for you to show off all of your hard work!
It doesn't matter if it is very basic or more complicated, we love to see them all.
Note - To upload a photo, it should be less than 1000 pixels wide.
Click here for easy instructions on resizing your photo.
There are so many different possibilities with these projects, and we'd love to see what you've come up with.
Simply use this form to share your project with us. And please...share a photo of your work!

Comments!
We love receiving your comments, but please read the notes below before posting. Thank you!NOTES:
-
All comments are moderated. If you leave the page you won't see your comment until it is approved.
-
Select the "Post to Facebook" check box to be notified on FB when a reply has been posted.
-
If you scan the previous comments you may find an answer to your question. Click the "View X more" link at the bottom (if visible) to see all comments.
-
Photos - If you would like to include a photo, please use our Photo Forums.
-
Questions - If you have a question, it may already be answered. Please tap or click here to search of our site first.
Recent Articles
-
Grant Park Picnic Area 5 and Seven Bridges Trail in South Milwaukee, WI
Oct 14, 25 10:58 AM
 Grant Park Picnic Area 5 and Seven Bridges Trail in South Milwaukee, WI Put grant park beach picnic area 5 in your map and park at the parking lot at
 -
What could this sea glass from Newport RI be from?
Oct 13, 25 12:57 PM
 I found this in Newport Rhode Island, the writing is very cool and id love to know what it’s from. You’ve unearthed something truly special — a red
 -
From Once the Ocean | Sea Glass Origins & Artistry – Odyssey Sea Glass
Sep 10, 25 02:21 PM
 Thank you, Jai! New Jersey can produce some nice sea glass. Sea glass crafts are such a fun way to turn those little ocean treasures into something beautiful
 -
Need help identifying sea glass
Aug 23, 25 08:37 AM
 Hi, This is the second piece of sea glass I have ever found. Not sure what it might have been. Pattern on it, shape and size has me wondering. Thank you
 -
Seacliff Beach Sea Glass | Santa Cruz Collecting & Cement Ship History
Aug 19, 25 04:09 PM
Explore Seacliff Beach sea glass in Santa Cruz—tips, photos, and the story of the cement ship now mostly washed away by storms. -
Best Sea Glass Beaches in Massachusetts
Aug 15, 25 07:18 PM
 Massachusetts sea glass finds—thick, frosted treasures with mysterious origins and timeless coastal charm.
 -
Responsible Sea Glass Collecting
Aug 14, 25 03:44 PM
 Explore the debate over sea glass collecting and its impact on beaches. Learn tips for responsible beachcombing, why sea glass is disappearing, and how to enjoy this hobby sustainably. Find advice, st…
 -
Conneaut Beach, Ohio - Sea Glass
Aug 08, 25 12:04 PM
 Conneaut Beach, Ohio — Sea Glass Conneaut Beach, tucked along the shores of Lake Erie in northeastern Ohio near Pennsylvania, offers
 -
Santa Monica: Sun, Sand, and Maybe Sea Glass?
Aug 01, 25 04:45 PM
Explore Santa Monica's top attractions and learn about the possibility of finding sea glass. Get tips for beachcombing on this famous California beach and see if you can discover your own ocean-tumble… -
Culburra beach glass
Jul 31, 25 05:17 PM
Culburra Beach – South Coast Sea Glass Haven Nestled on the beautiful South Coast of New South Wales, Culburra Beach is a quiet coastal town known for
Comments!
We love receiving your comments, but please read the notes below before posting. Thank you!NOTES:
All comments are moderated. If you leave the page you won't see your comment until it is approved.
Select the "Post to Facebook" check box to be notified on FB when a reply has been posted.
If you scan the previous comments you may find an answer to your question. Click the "View X more" link at the bottom (if visible) to see all comments.
Photos - If you would like to include a photo, please use our Photo Forums.
Questions - If you have a question, it may already be answered. Please tap or click here to search of our site first.